
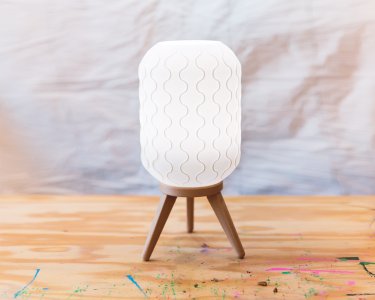
mid-century modern lamp
autor Catdad Workshop · Printables
Máte soubor? Vytiskněte ho na naší tiskárně
Licence modelu (CC BY-SA (s uvedením autora, stejná licence)) dovoluje i komerční použití. Stáhněte si soubor u zdroje a nahrajte ho k nám. Autora a zdroj uvedeme u objednávky za vás.
Nahrát soubor a vytisknout- Licence
- CC BY-SA (s uvedením autora, stejná licence)
- Největší rozměr
- asi 180 mm
- Odhad tisku
- asi 142 g filamentu, 6 h 25 min
- Cena u nás
- od 393 Kč (PLA, 1 ks)Přesnou cenu spočítá kalkulace po nahrání souboru.
O modelu
It finally happened! The day every 3D printing enthusiast dreams about. My girlfriend walked into the room on Wednesday evening, showed me a picture of a lamp, and said "can you design and print something like this for me". Little did she know, this week's contest is LED Diffusers, which can more broadly be understood as lamps I guess (I promise, I am using an LED bulb). The problem, however, is that I need to be on a flight midday Friday. And I have work on Thursday. Luckily, who can sleep around . The following is what I designed, printed, assembled, and photographed in basically one day. Also, as a side note, I think the cat is mad at me. She refused to participate in the photoshoot today. I should consider getting a banana for future scale needs. Materials In addition to all the printed parts in this post, you will need a standard HEMMA 40mm light cord. Often, they are listed as "pendant light cord" or "hanging light kit" online. I purchased this specific one, but the dimensions match several other kits I have purchased in the past as well, so I am pretty sure they are all the same. This rope cord looks like it might be pretty cute with the lamp too. You will also need a standard light bulb. Though optional, you may also want to have a deburring tool, a razor or x-acto knife, and some sandpaper to clean up the prints (cleaning up any elephant's foot will be essential for a good fit for this model). Printing You will need to print one of each part: the lamp shade, the insert, the base, and one of each spacer. All parts are designed to be printed on a standard, run-of-the-mill printer, with no modifications required. Here are the settings I recommend for each: Lamp shade settings Print this in vase mode. Unless you are going for some sort of visual effect, I suggest printing this in a white filament. My settings were as follows: • Spiral vase mode / Spiralize outer contour (i.e. vase mode): turn this on, that's what this mode is all about • Layer height:
Podobné modely
Christmas cat lamp
matplace
Dragon lamp
matplace
Space Table Lamp
matplace

Deadspace+Marker+Lamp
matplace
Christmas Tree now with lamp base
matplace